WEICON-Logo_blog_final@0,5xWEICON-Logo_small_blog_final@0,25xWEICON-Logo_blog_final@0,5xWEICON-Logo_blog_final@0,5x
  • Home
  • Blog
  • Social Media
  • Team
  • Contact
English
  • Deutsch
weicon.de
✕

Repairing a broken bumper – With adhesives from WEICON

Published by Mike Breitenfeld – Application Engineering at 14. February 2017
Categories
  • Around the vehicle
Tags

A jostle in the car park and it suddenly happens – a tear in the plastic. Without a bumper the damage would definitely be greater. That’s because the bumper absorbs the energy from the impact when there is an accident thereby protecting the chassis. Bumpers used to be made from solid steel and posed a hazard, especially to other road users like pedestrians or cyclists. The effects from a collision were often serious cases of broken bones. Today’s plastic bumpers minimize the risk of injury significantly.

The car bumper is as important as the headlights. If it breaks it should be repaired as quickly as possible. But unlike a defective light bulb, you don’t necessarily have to replace it.

The repair

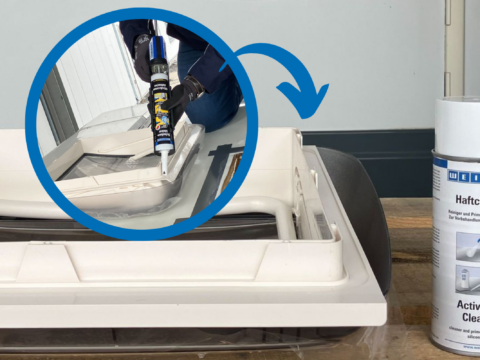
We repaired a torn bumper using our construction adhesive Easy-Mix PE-PP 45 and fibreglass tape, quickly and easily. First, the tear should be fixated using adhesive tape so that it doesn’t get any bigger. In the second step, the interior – the area that will be repaired later – should be sanded down using medium grain size sandpaper, and then treated with WEICON Surface Cleaner.

The adhesive being used here consists of two components. Thanks to the double cartridge they are already mixed together in the right proportion inside the nozzle and the adhesive can be applied generously to the tear from the inside. The adhesive should then be distributed with a spatula. Afterwards, place a piece of fibreglass cut to size onto the tear and apply pressure. Be sure to wear gloves or use a tool to ensure that hands do not come into contact with the adhesive. Finally, apply the adhesive again generously and let harden at room temperature.

After 24 hours the bumper is fully functional again. For the perfect look you can grind down the outside and re-paint it.

1

Fixate the tear from outside with adhesive tape

2

After sanding and cleaning the area, apply adhesive to the tear

3

Spread the adhesive and apply another coat

4

Cut fibreglass to size, press on and apply adhesive again

Mike Breitenfeld – Application Engineering
Mike, who is a trained export packer and wholesale and export merchant, started working at the WEICON warehouse in 2000. One year later, he switched to our sales department and in 2012 to the product management. He has been working as application engineer since 2014. Mike uses a lot of our products for model making in his hobby room. He makes miniature trees using adhesive sprays, fixes roofs of miniature houses using superglue or restores a turnout lantern as decoration for his garden by using corrosion protection.

Related posts

Camper-Van-selber-ausbauen_Titelbild
20. December 2023

Camper van conversion by yourself – On a great journey with WEICON


Read more
Kopie von Titelbild WEICON Blog (2)
17. August 2023

Install and glue a camper van´s skylight


Read more
Zurrschiene bzw. Airlinieschiene im Wohnmobil besfestigen - Anleitung
29. July 2022

Create storage space: How to install airline rails in a motorhome


Read more

Leave a Reply Cancel reply

Your email address will not be published. Required fields are marked *

2019 | WEICON GmbH & Co.KG
Impressum | Datenschutzerklärung
Blogverzeichnis - Bloggerei.de
weicon.de
English
  • Deutsch
  • English