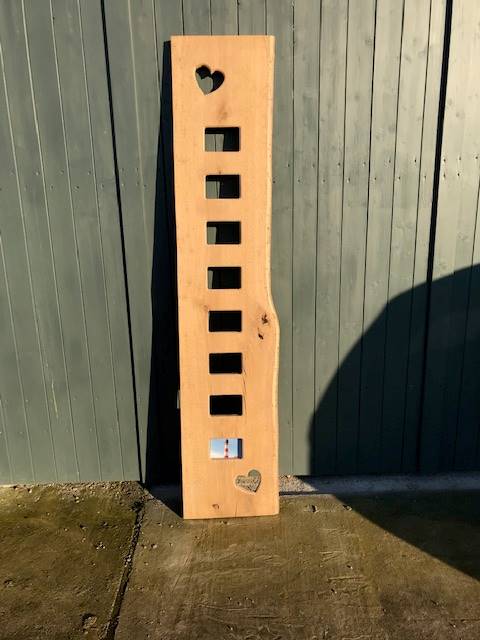
Do you happen to have a spare oak plank or have you bought one deliberately to make a photo tree trunk? The oak picture frame is definitely an eye-catcher and a truly unique piece in your home. That’s exactly what our colleague Gerold thought and grabbed his leftover oak plank. Find out how you can easily recreate such a unique piece here:
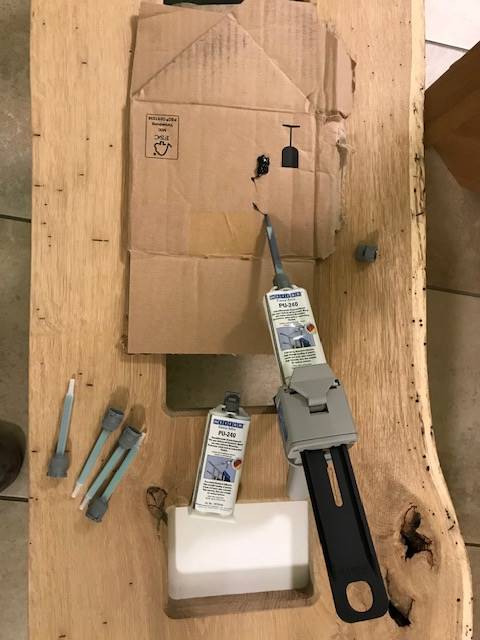
You will need the following materials for your oak picture frame:
- Gloves
- Possibly scale
- Oak plank
- Plywood as a model for router
- Router with slot cutter and copy ring
- Hoover
- Rebate milling cutter with ring for router
- Optional: Glass pane
- Back panel
- Drill
- Screws
- Washers
- Suspension/old chair brackets
- Chisel or similar
- Compressed air unit
- WEICON Easy-Mix PU-240 with Mixing Nozzle
- Dispenser Easy-Mix D50
- Possibly adhesive tape
- Transparent hard wax oil
- Brush
- Grinder/eccentric sander
- Wall hook/screw hook
- Cloth
Step-by-step instructions on how to turn your oak plank into a photo tree trunk
1. Create a template for the photo tree trunk
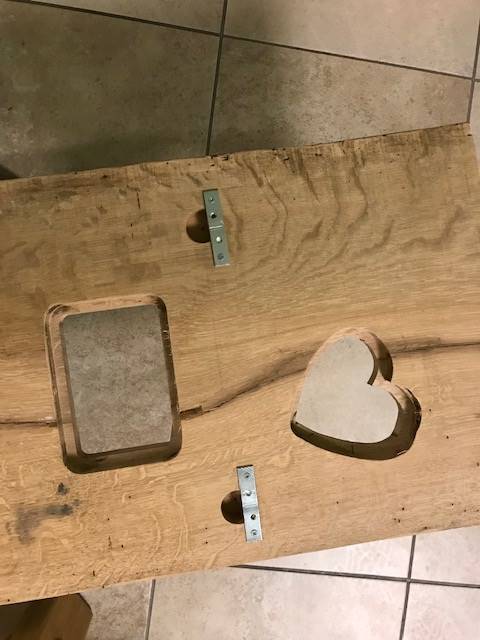
Put on work gloves first to avoid injury. Then pick up your oak panel and work out the size of the cut-outs for your pictures. Gerold’s board was approx. 200 x 35 cm – he opted for postcard formats. If you don’t know the dimensions of your board, measure it once – or make a rough estimate. Now you can make the routing template. To do this, take a plywood strip and cut out the desired frame using the copy ring on your router. Make sure that the cut-out is large enough, but that the photo does not fall out later. Optionally, you can also insert a pane of glass to hold the picture in place. You can find detailed instructions online.
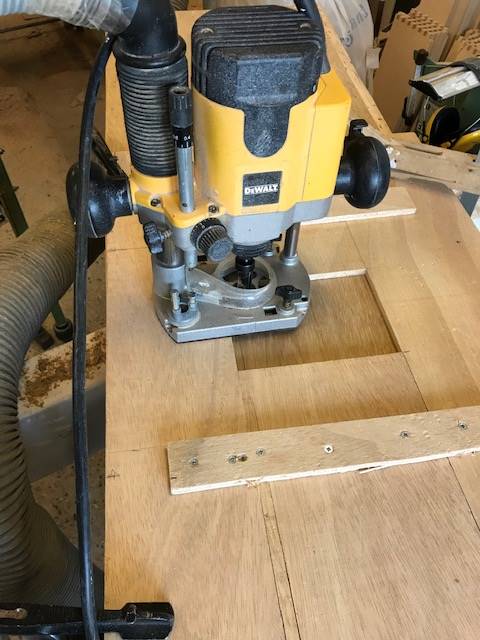

2. Cut-outs for picture frames in oak wood
Now use a rebate cutter and thrust ring to mill a rebate of approx. 12 mm width on the back, where the glass with the picture and the carrier plate lie against each other. Simply fix the matching photo back panel in place with screws and washers. If you want to attach your photo tree trunk to a wall later, you can drill a few holes in the back of the oak plank (e.g. 35 mm with a Forstner drill) and screw on your desired mounting. Gerold reused old chair brackets here by bending them straight. He later used standard wall plugs with screw hooks to secure the wooden plank to the wall.
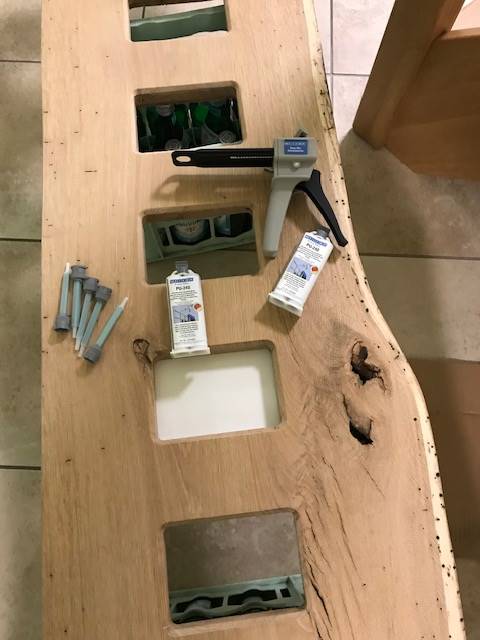
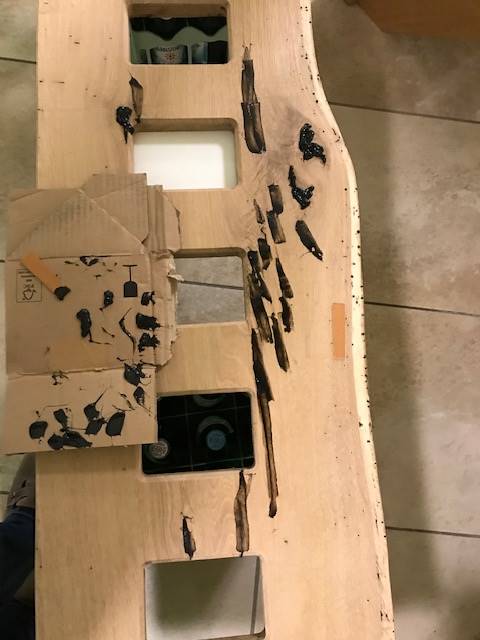
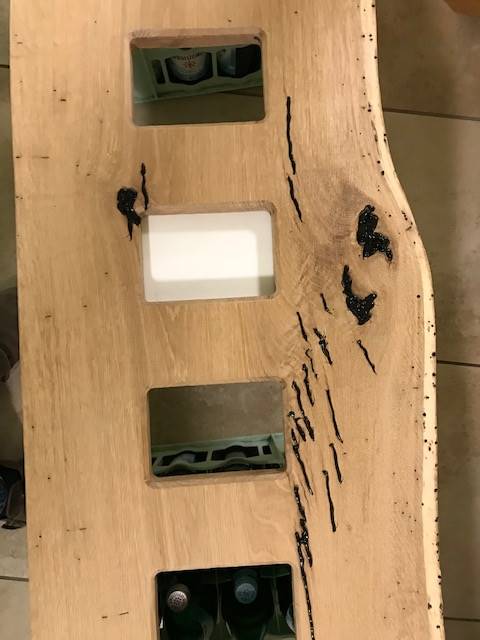
3. Bond break-out points in the photo tree trunk
Now it’s time to start bonding: If your wooden plank has any chipped or loose areas, you should remove and clean these beforehand. The quickest way to do this is with a chisel and compressed air. Once this is done, you can fill the areas with WEICON Easy-Mix PU-240. To do this, place the adhesive in the corresponding Dispenser Easy-Mix D 50 and attach the mixing spiral so that the two-component adhesive mixes. You may need to apply the adhesive several times, as a little material will always seep in during the curing process. If your plank has a real hole, simply stick a piece of adhesive tape on the back so that nothing leaks out.
4. Sanding the photo tree trunk
Once the adhesive has hardened, you can sand the plank outside. Make sure you wear an FFP2 mask so that you don’t inhale the toxic sanding dust. If you want to sand your oak plank indoors, you will need a good extraction system. Small bubbles in the hardened adhesive can easily be filled with a little more Easy-Mix PU-240 and then sanded down again. You can repeat this process until you achieve the desired result. For the perfect surface finish, you can sand the entire surface once with a random orbital sander and 150-180 grit sandpaper.
5. Oiling oak wood
Your plank is then ready to be oiled. Use transparent hard wax oil and a brush. After the first coat of oil, do an intermediate sanding, then you can apply the second coat. If, like Gerold, you have decided to attach your oak plank to the wall, you can now screw your screw hooks into the wall. Four wall hooks were enough for Gerold’s photo tree trunk. The photo tree trunk is finished!
Would you like more DIYs that you can easily recreate? Take a look here to get inspired and customise your own home to your taste.