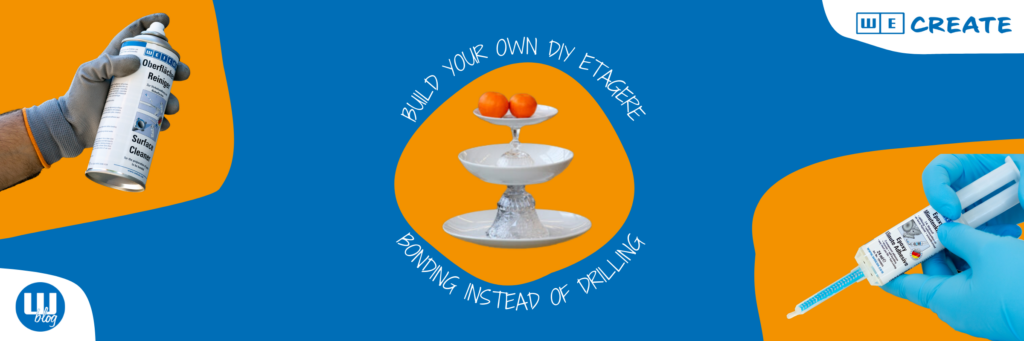
A buffet étagère is nothing new but it’s still very popular. They are available in a wide variety of designs. They offer practical and space-saving storage space for fruit, cupcakes etc. and are also a real eye-catcher. But on the other hand it’s mostly very expensive. Depending on the size, shape or color you have to invest part up to 120 euros. So why not build your own etagere? You can save a lot of money this way. You may have all what you need at home for your DIY.
What utensils are needed for the étagère ?
For a three-tiered étagère you need three plates. If possible a large, a medium and a small one as well as two glasses or cups. These work as pedestals.
Perhaps there is still old porcelain, which has no use anymore or you look in a vintage shop for plates and glasses, which you like.
Bonding instead of drilling
No mixing required
Instead of a drill, we used our two-component Epoxy Minute Adhesive. Due to the dosing system, the two components in the nozzle are mixed together in the right proportion – no annoying measurement is necessary. The adhesive is viscous and cures quickly. It is also transparent and ideal for bonding ceramic, glass, metal and many other materials.
Cleaning is the key
But before you start bonding, there is an important step: Clean first! Even if the dishes were washed before. And yes, a few years ago I would have skipped this part probably but it is really important for the bonding. Just spray the Surface Cleaner onto a clean, lint-free cloth and clean the plate and glasses.


Plate by plate – build your own étagère
Now the project starts: build your own étagère. We started with the largest plate and placed a glass, the first base, on this. For this purpose, apply a thin strip of adhesive to the edge of the glass or cup and place it centrally on the plate. You have to be very precise, as the adhesive quickly cures and the glass can no longer be positioned. Short pressure and the first step is finished. Now follows the next floor: The second plate on the first base. Apply a thin glue bead on the glass edge and place the plate in the center of the glass.
So that the whole thing can dry already, we have continued with plate number three and socket number two. Place the second glass in the center of the plate. The way you turn around the glass is up to you. We decided to put the glasses on the head.
Now you can put both elements together, add the adhesive to the second glass and stick to the second plate – that’s all you have to do! It is best to leave the étagère cure until the next day.
Et voilà: Your homemade étagère!
Of course, you can also add more tiers or use cups instead of glasses. Just let your creativity run wild.
A little tip! An étagère is also a great gift – whether for a birthday, anniversary or wedding.
If you still need support, then take a look at our WE create video.

Written by guest author Mona Schele